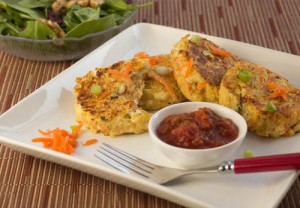
Crispy Quinoa Cakes
For more healthy recipes by Aviva Goldfarb, visit her site at The Six O’Clock Scramble.

- 1 cup quinoa
- 1 carrot, finely grated, about ¾ cup
- 2 scallions, thinly sliced, green and white parts
- 4 eggs, beaten
- ½ cup low fat cottage cheese
- ¾ cup crumbled feta cheese, or use shredded Cheddar cheese
- 3 Tbsp. whole wheat flour, or use potato flour or potato starch for a gluten-free option
- ¼ tsp. black pepper
- ½ tsp. ground cumin
- ½ tsp. salt
- 5 – 6 Tbsp. extra virgin olive oil
- Tomato sauce and/or ketchup, for serving, or use applesauce, salsa, or whatever sauce you prefer
- Cook the quinoa according to the package directions (1 part quinoa to 2 parts water) to yield about 2½ cups (no need to measure the cooked quinoa).
- Remove the lid and remove the pan from the heat to cool. (This can be done up to 24 hours in advance.)
- In a large bowl, combine the quinoa with the remaining ingredients except the oil and the serving condiments, and mix thoroughly.
- Heat the oven to 300 degrees, line a baking sheet with a silicone mat or coat it with nonstick cooking spray, and heat 2 Tbsp. of the oil in a large nonstick skillet (use 2 if you have them) over medium heat.
- When it is hot, pack some of the mixture into a ¼ cup measuring cup and drop it into the skillet, flattening it with the bottom of the cup so it’s about ¼ – ½-inch thick. Repeat with enough cakes to fill the pan without crowding it.
- Cook without moving them for about 4 minutes per side until they are golden brown and crispy on the outside. (Meanwhile, prepare the salad, if you are serving it.)
- Transfer the cooked patties to a baking sheet to keep them warm, and repeat with the remaining batter, adding 1 Tbsp. oil to the skillet as needed.
- The second and third batches will likely cook more quickly, but if they are browning too quickly, reduce the heat.
- Serve them immediately with tomato sauce, ketchup, or condiments of your choice, or refrigerate them for up to 3 days, or freeze them for up to 3 months.
Scramble Flavor Booster: Sprinkle the cakes lightly with cayenne pepper as you add them to the skillet.
Tip: If the cakes stick to your nonstick skillet, it may be time to replace your pan. Unlike stainless, cast iron and ceramic skillets, nonstick skillets usually need to be replaced every few years. Make sure not to stack anything on top of them to protect their nonstick surface, or if you do, protect their surface with a cloth napkin or dishtowel.
This recipe is republished here with permission from the author. The original recipe may be found here.

